Extensions
Fundamentally, JupyterLab is designed as an extensible environment. JupyterLab extensions can customize or enhance any part of JupyterLab. They can provide new themes, file viewers and editors, or renderers for rich outputs in notebooks. Extensions can add items to the menu or command palette, keyboard shortcuts, or settings in the settings system. Extensions can provide an API for other extensions to use and can depend on other extensions. In fact, the whole of JupyterLab itself is simply a collection of extensions that are no more powerful or privileged than any custom extension.
JupyterLab extensions are npm packages (the standard package format in Javascript development). You can search for the keyword jupyterlab-extension on the npm registry to find extensions. For information about developing extensions, see the developer documentation.
Note
If you are a JupyterLab extension developer, please note that the extension developer API is not stable and will evolve in the near future.
In order to install JupyterLab extensions, you need to have Node.js installed.
If you use conda, you can get it with:
conda install -c conda-forge nodejs
If you use Homebrew on Mac OS X:
brew install node
You can also download Node.js from the Node.js website and install it directly.
Using the Extension Manager
To manage your extensions, you can use the extension manager. By default, the manager is disabled. You can enable it by searching Extension Manager in the command palette.
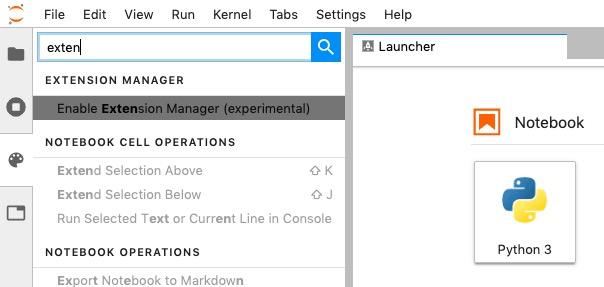
Figure: Enable extension manager by searching in the command palette
You can also enable it with the following steps:
- Go into advanced settings editor.
- Open the Extension Manager section.
- Add the entry “enabled”: true.
- Save the settings.
- If prompted whether you are sure, read the warning, and click “Enable” if you are still sure.
Once enabled, you should see a new tab appear in the left sidebar.
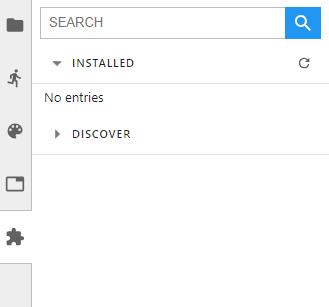
Figure: The default view has three components: a search bar, an “Installed” section, and a “Discover” section.
Finding Extensions
You can use the extension manager to find extensions for JupyterLab. To discovery freely among the currently available extensions, expand the “Discovery” section. This triggers a search for all JupyterLab extensions on the NPM registry, and the results are listed according to the registry’s sort order. An exception to this sort order is that extensions released by the Jupyter organization are always placed first. These extensions are distinguished by a small Jupyter icon next to their name.
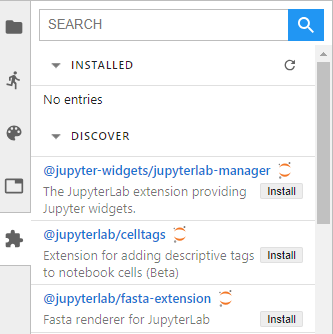
Alternatively, you can limit your discovery by using the search bar. This performs a free-text search of JupyterLab extensions on the NPM registry.
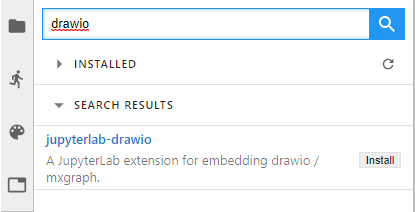
Installing an Extension
Once you have found an extension that you think is interesting, install it by clicking the “Install” button of the extension list entry.
Danger
Installing an extension allows it to execute arbitrary code on the server, kernel, and in the client’s browser. You should therefore avoid installing extensions you do not trust, and watch out for any extensions trying to masquerade as a trusted extension.
A short while after starting the install of an extension, a drop-down should appear under the search bar indicating that the extension has been downloaded, but that a rebuild is needed to complete the installation.
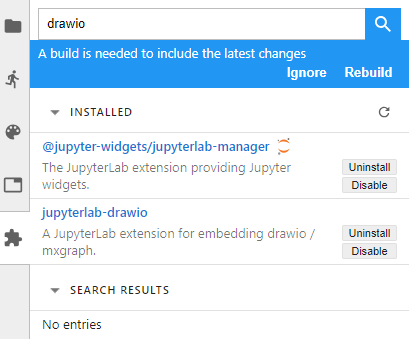
If you want to install/uninstall other extensions as well, you can ignore the rebuild notice until you have made all the changes you want. Once satisfied, click the ‘Rebuild’ button to start a rebuild in the background. Once the rebuild completes, a dialog will pop up, indicating that a reload of the page is needed in order to load the latest build into the browser.
If you ignore the rebuild notice by mistake, simply refresh your browser window to trigger a new rebuild check.
Managing Installed Extensions
When there are some installed extensions, they will be shown in the “Installed” section. These can then be uninstalled or disabled. Disabling an extension will prevent it from being activated, but without rebuilding the application.
Companion packages
During installation of an extension, JupyterLab will inspect the package metadata for any instructions on companion packages. Companion packages can be:
- Notebook server extensions (or any other packages that need to be installed on the Notebook server).
- Kernel packages. An example of companion packages for the kernel are Jupyter Widget packages, like the ipywidgets Python package for the @jupyter-widgets/jupyterlab-manager package.
If JupyterLab finds instructions for companion packages, it will present a dialog to notify you about these. These are informational only, and it will be up to you to take these into account or not.
Using the Terminal
Another way of managing your extensions is from the terminal on the server,
using the jupyter labextension entry point. In general, a simple help text
is available by typing jupyter labextension --help.
Installing Extensions
You can install new extensions into the application using the command:
jupyter labextension install my-extension
where my-extension is the name of a valid JupyterLab extension npm package
on npm. Use the my-extension@version
syntax to install a specific version of an extension, for example:
jupyter labextension install my-extension@1.2.3
You can also install an extension that is not uploaded to npm, i.e.,
my-extension can be a local directory containing the extension, a gzipped
tarball, or a URL to a gzipped tarball.
We encourage extension authors to add the jupyterlab-extension
GitHub topic to any repository with a JupyterLab extension to facilitate
discovery. You can see a list of extensions by searching GitHub for the
jupyterlab-extension
topic.
You can list the currently installed extensions by running the command:
jupyter labextension list
Uninstall an extension by running the command:
jupyter labextension uninstall my-extension
where my-extension is the name of the extension, as printed in the
extension list. You can also uninstall core extensions using this
command (you can always re-install core extensions later).
Installing and uninstalling extensions can take some time, as they are
downloaded, bundled with the core extensions, and the whole application
is rebuilt. You can install/uninstall more than one extension in the
same command by listing their names after the install command.
If you are installing/uninstalling several extensions in several stages,
you may want to defer rebuilding the application by including the flag
--no-build in the install/uninstall step. Once you are ready to
rebuild, you can run the command:
jupyter lab build
Note If using Windows, you may encounter a FileNotFoundError due to the default PATH length on Windows. Node modules are stored in a nested file structure, so the path can get quite long. If you have administrative access and are on Windows 8 or 10, you can update the registry setting using these instructions: https://stackoverflow.com/a/37528731.
Disabling Extensions
You can disable specific JupyterLab extensions (including core extensions) without rebuilding the application by running the command:
jupyter labextension disable my-extension
This will prevent the extension from loading in the browser, but does not require a rebuild.
You can re-enable an extension using the command:
jupyter labextension enable my-extension
Advanced Usage
Any information that JupyterLab persists is stored in its application directory,
including settings and built assets.
This is separate from where the Python package is installed (like in site_packages)
so that the install directory is immutable.
The application directory can be overridden using --app-dir in
any of the JupyterLab commands, or by setting the JUPYTERLAB_DIR
environment variable. If not specified, it will default to
<sys-prefix>/share/jupyter/lab, where <sys-prefix> is the
site-specific directory prefix of the current Python environment. You
can query the current application path by running jupyter lab path.
Note that the application directory is expected to contain the JupyterLab
static assets (e.g. static/index.html). If JupyterLab is launched
and the static assets are not present, it will display an error in the console and in the browser.
JupyterLab Build Process
To rebuild the app directory, run jupyter lab build. By default, the
jupyter labextension install command builds the application, so you
typically do not need to call build directly.
Building consists of:
- Populating the
staging/directory using template files - Handling any locally installed packages
- Ensuring all installed assets are available
- Bundling the assets
- Copying the bundled assets to the
staticdirectory
Note that building will always use the latest JavaScript packages that meet
the dependency requirements of JupyterLab itself and any installed extensions.
If you wish to run JupyterLab with the set of pinned requirements that was
shipped with the Python package, you can launch as
jupyter lab --core-mode.
Note
The build process uses a specific yarn version with a default working
combination of npm packages stored in a yarn.lock file shipped with
JupyterLab. Those package source urls point to the default yarn registry.
But if you defined your own yarn registry in yarn configuration, the
default yarn registry will be replaced by your custom registry.
If then you switch back to the default yarn registry, you will need to
clean your staging folder before building:
jupyter lab clean
jupyter lab build
JupyterLab Application Directory
The JupyterLab application directory contains the subdirectories
extensions, schemas, settings, staging, static, and
themes. The default application directory mirrors the location where
JupyterLab was installed. For example, in a conda environment, it is in
<conda_root>/envs/<env_name>/share/jupyter/lab. The directory can be
overridden by setting a JUPYTERLAB_DIR environment variable.
It is not recommended to install JupyterLab in a root location (on Unix-like
systems). Instead, use a conda environment or pip install --user jupyterlab
so that the application directory ends up in a writable location.
Note: this folder location and semantics do not follow the standard Jupyter config semantics because we need to build a single unified application, and the default config location for Jupyter is at the user level (user’s home directory). By explicitly using a directory alongside the currently installed JupyterLab, we can ensure better isolation between conda or other virtual environments.
extensions
The extensions directory has the packed tarballs for each of the
installed extensions for the app. If the application directory is not
the same as the sys-prefix directory, the extensions installed in
the sys-prefix directory will be used in the app directory. If an
extension is installed in the app directory that exists in the
sys-prefix directory, it will shadow the sys-prefix version.
Uninstalling an extension will first uninstall the shadowed extension,
and then attempt to uninstall the sys-prefix version if called
again. If the sys-prefix version cannot be uninstalled, its plugins
can still be ignored using ignoredPackages metadata in settings.
schemas
The schemas directory contains JSON
Schemas that describe the settings used by
individual extensions. Users may edit these settings using the
JupyterLab Settings Editor.
settings
The settings directory may contain page_config.json, overrides.json, and/or
build_config.json files, depending on which configurations are
set on your system.
page_config.json
The page_config.json data is used to provide configuration data to the
application environment.
The following configurations may be present in this file:
terminalsAvailableidentifies whether a terminal (i.e.bash/tschon Mac/Linux ORPowerShellon Windows) is available to be launched via the Launcher. (This configuration was predominantly required for Windows prior to PowerShell access being enabled in Jupyter Lab.) The value for this field is a Boolean:trueorfalse.disabledExtensionscontrols which extensions should not load at all.deferredExtensionscontrols which extensions should not load until they are required by something, irrespective of whether they setautoStarttotrue.
The value for the disabledExtensions and deferredExtensions fields
are an array of strings. The following sequence of checks are performed
against the patterns in disabledExtensions and deferredExtensions.
- If an identical string match occurs between a config value and a
package name (e.g.,
"@jupyterlab/apputils-extension"), then the entire package is disabled (or deferred). - If the string value is compiled as a regular expression and tests
positive against a package name (e.g.,
"disabledExtensions": ["@jupyterlab/apputils*$"]), then the entire package is disabled (or deferred). - If an identical string match occurs between a config value and an
individual plugin ID within a package (e.g.,
"disabledExtensions": ["@jupyterlab/apputils-extension:settings"]), then that specific plugin is disabled (or deferred). - If the string value is compiled as a regular expression and tests
positive against an individual plugin ID within a package (e.g.,
"disabledExtensions": ["^@jupyterlab/apputils-extension:set.*$"]), then that specific plugin is disabled (or deferred).
An example of a page_config.json file is:
{
    "disabledExtensions": [
        "@jupyterlab/toc"
    ],
    "terminalsAvailable": false
}
overrides.json
You can override default values of the extension settings by
defining new default values in an overrides.json file.
So for example, if you would like
to set the dark theme by default instead of the light one, an
overrides.json file containing the following lines needs to be
added in the application settings directory (by default this is the
share/jupyter/lab/settings folder).
{
  "@jupyterlab/apputils-extension:themes": {
    "theme": "JupyterLab Dark"
  }
}
build_config.json
The build_config.json file is used to track the local directories
that have been installed using
jupyter labextension install <directory>, as well as core extensions
that have been explicitly uninstalled. An example of a
build_config.json file is:
{
    "uninstalled_core_extensions": [
        "@jupyterlab/markdownwidget-extension"
    ],
    "local_extensions": {
        "@jupyterlab/python-tests": "/path/to/my/extension"
    }
}
staging and static
The static directory contains the assets that will be loaded by the
JupyterLab application. The staging directory is used to create the
build and then populate the static directory.
Running jupyter lab will attempt to run the static assets in the
application directory if they exist. You can run
jupyter lab --core-mode to load the core JupyterLab application
(i.e., the application without any extensions) instead.
themes
The themes directory contains assets (such as CSS and icons) for
JupyterLab theme extensions.
JupyterLab User Settings Directory
The user settings directory contains the user-level settings for Jupyter extensions.
By default, the location is ~/.jupyter/lab/user-settings/, where ~ is the user’s home directory. This folder is not in the JupyterLab application directory,
because these settings are typically shared across Python environments.
The location can be modified using the JUPYTERLAB_SETTINGS_DIR environment variable. Files are automatically created in this folder as modifications are made
to settings from the JupyterLab UI. They can also be manually created. The files
follow the pattern of <package_name>/<extension_name>.jupyterlab-settings.
They are JSON files with optional comments. These values take precedence over the
default values given by the extensions, but can be overridden by an overrides.json
file in the application’s settings directory.
JupyterLab Workspaces Directory
JupyterLab sessions always reside in a workspace. Workspaces contain the state
of JupyterLab: the files that are currently open, the layout of the application
areas and tabs, etc. When the page is refreshed, the workspace is restored.
By default, the location is ~/.jupyter/lab/workspacess/, where ~ is the user’s home directory. This folder is not in the JupyterLab application directory,
because these files are typically shared across Python environments.
The location can be modified using the JUPYTERLAB_WORKSPACES_DIR environment variable. These files can be imported and exported to create default “profiles”,
using the workspace command line tool.