


Interface Customization#
Multiple elements in the JupyterLab interface are customizable to display new elements or hide default ones.
Layout#
The JupyterLab layout has two modes: the simple mode (or single document mode) and the default
mode (or multiple documents mode). In both modes, the widgets are attached in one of the four
area: the left or right sidebars, the main dock panel area or the down area.
The default positions of widgets can be overridden through the settings based on the type of widgets. The setting to modify is the layout one in section JupyterLab Shell.
The available widget types and their default area is listed below
Type |
multiple |
single |
|---|---|---|
Console |
main |
main |
CSVTable |
main |
main |
TSVTable |
main |
main |
Editor |
main |
main |
HTML Viewer |
main |
main |
Image |
main |
main |
Image (Text) |
main |
main |
JSON |
main |
main |
Markdown Preview |
main |
main |
Notebook |
main |
main |
Cloned Output |
main |
down |
Linked Console |
main |
down |
Inspector |
main |
down |
main |
main |
|
Terminal |
main |
main |
VDOM |
main |
main |
Vega-Lite4 |
main |
main |
Vega5 |
main |
main |
Settings |
main |
main |
Advanced Settings |
main |
main |
Licenses |
main |
main |
Debugger |
right |
right |
Debugger Variables |
main |
main |
Debugger Sources |
main |
main |
Property Inspector |
right |
right |
Extension Manager |
left |
left |
File Browser |
left |
left |
Sessions and Tabs |
left |
left |
Table of Contents |
left |
left |
Log Console |
down |
down |
"layout": {
  "single": {
    "Linked Console": { "area": "down" },
    "Inspector": { "area": "down" },
    "Cloned Output": { "area": "down" },
    // Add new terminals in the down area in simple mode
    "Terminal": { "area": "down" }
  },
  "multiple": {
    // Add new terminals in the right sidebar in default mode
    "Terminal": { "area": "right" }
  }
}
The above example will result in the following changes:
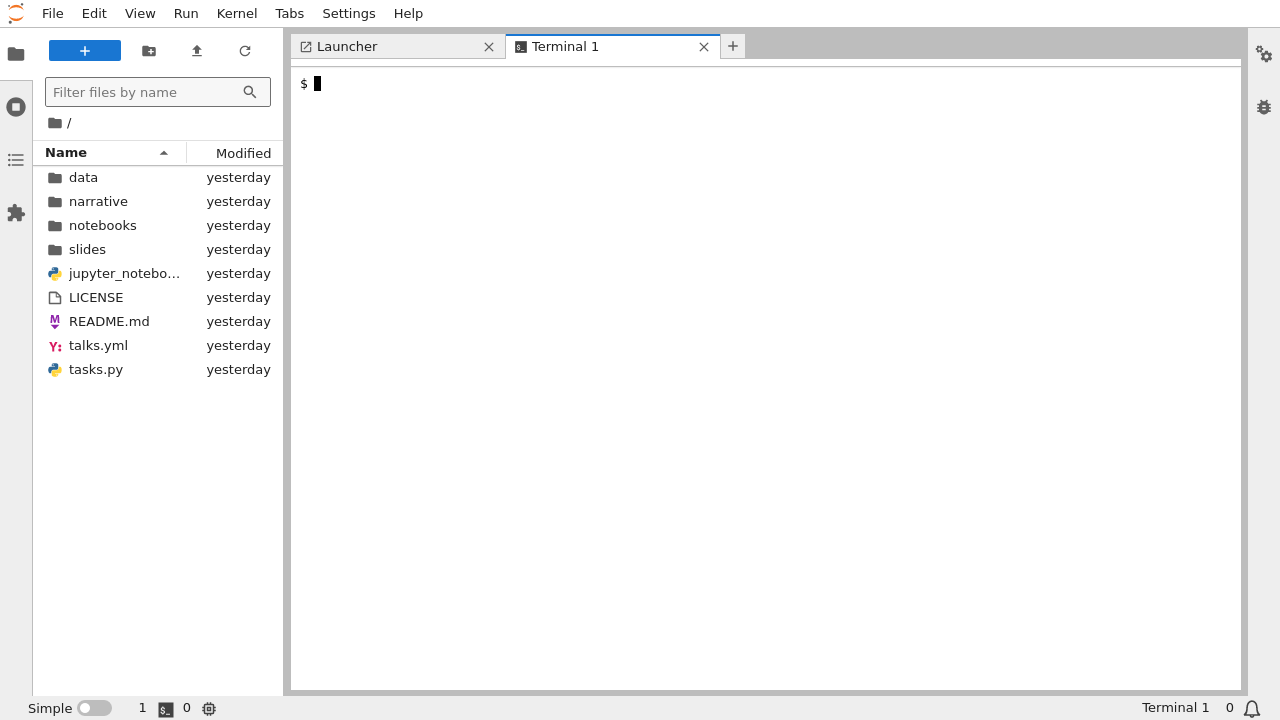
(Before Change) Default terminal position in “multiple” (default) mode#
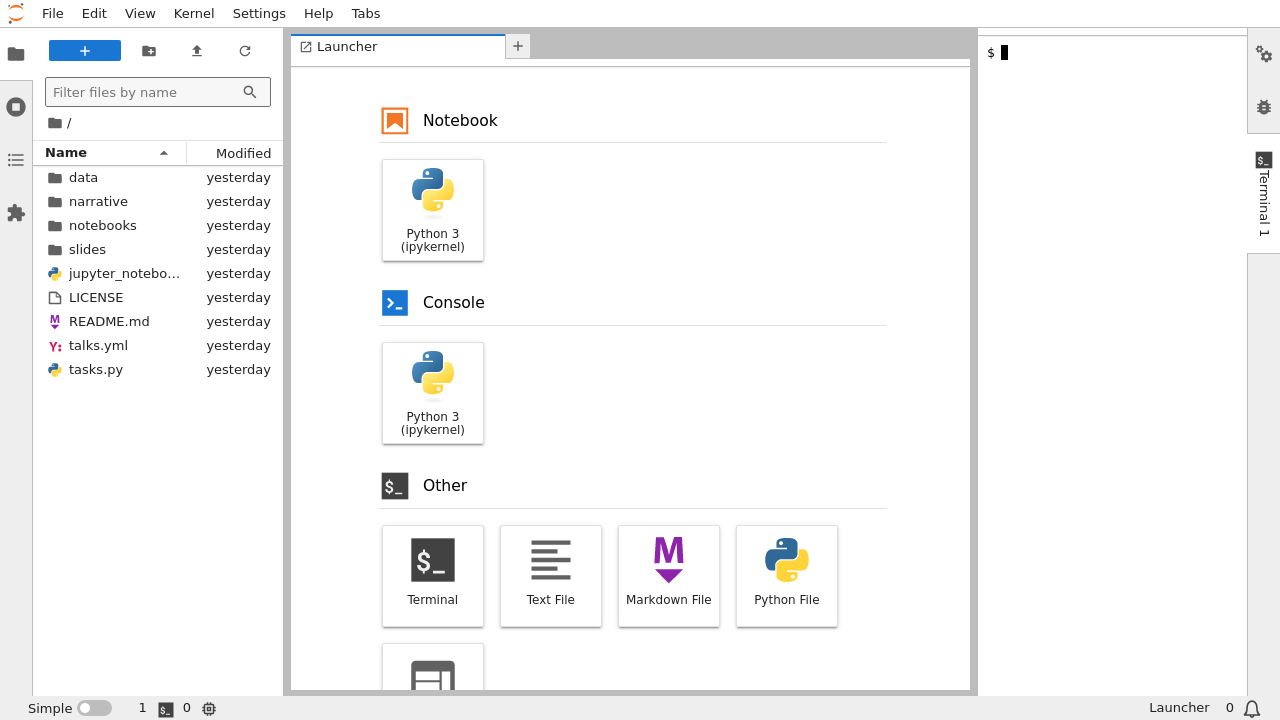
(After Change) Customized terminal position in “multiple” (default) mode#
Move open widgets#
You can also move an open widget directly from its tab context menu. Right-click the widget tab in a sidebar, the main work area, or the down area, select Move Widget To, and choose the destination area.

The Move Widget To submenu lists the available destination areas.#

The file browser moved from the left sidebar to the main work area.#

The sessions and tabs panel moved from the left sidebar to the down area.#
Those changes are stored in the workspace layout, so they are restored when you
reopen the same workspace. They do not change the type-based layout setting
described above, which controls the default area for future widgets.
Move accordion sections between panels#
Individual accordion sections within a sidebar panel can be moved to another panel via the context menu.
Right-click the section header (e.g. “OPEN TABS”) in the Running Sessions panel.
Choose Move to File Browser.

The section appears inside the File Browser, where it can be dragged to reorder it above or below the file listing. To move it back, right-click the section header and choose Move back to Running Sessions. The layout is saved and restored on reload.
Activity Bar Position#
The side activity bars (left and right) display the tabs of the widgets attached to the corresponding side area. By default, each activity bar is rendered vertically on the natural side of its area (left for the left area, right for the right area). You can move them to the top or bottom of their area to display the tabs horizontally.
The position is controlled by the activityBarPosition setting in the
JupyterLab Shell section. The available values are:
side(default): each activity bar stays on the natural side of its areatop: both activity bars are moved to the top of their respective areabottom: both activity bars are moved to the bottom of their respective area
"activityBarPosition": "top"
The same options are also available interactively from the View → Appearance → Activity Bar Position menu.
The screenshots below illustrate the top and bottom positions:

Activity bar positioned at the top of each side area#

Activity bar positioned at the bottom of each side area#
Toolbars#
In addition to the toolbars attached to individual widgets, JupyterLab provides a TopBar extension point that allows extensions to add items to the application top bar area.
Lots of toolbars are customizable. Here is a mapping of the customizable toolbars and the associated setting.
Cell: Cell Toolbar -> toolbar
CSV Viewer: CSV Viewer -> toolbar
File Browser: File Browser Widget -> toolbar
HTML Viewer: HTML Viewer -> toolbar
Notebook panel: Notebook Panel -> toolbar
Text Editor: Text Editor -> toolbar
TSV Viewer: TSV Viewer -> toolbar
Those settings are accessible through the interactive Settings Editor. But you may find more comfortable to use the Advanced Settings Editor (accessible by clicking on JSON Settings Editor button in the top right corner of the Settings Editor).
Your toolbar customization will be merged with the default menu bar definition (this
is a different behavior as the other settings that are overriding the default settings).
So to remove a default item, you will need to disable it. To do that, you will need
to set the toolbar item disabled attribute to true; an item is uniquely identified
by its name attribute.
"toolbar": [
  // Disable the restart and run all button
  {
    "name": "restart-and-run",
    "disabled": true
  },
  // Add a new button to clear all cell outputs
  {
    "name": "clear-all-outputs",
    "command": "notebook:clear-all-cell-outputs"
  }
]
The above example for the notebook panel, will results in the following changes:

Default notebook toolbar#

Customized notebook toolbar#
A toolbar is defined by a list of items. Each item must have an unique name. That
name will create a toolbar item if it is associated with a special widget (e.g. the
cell type toolbar selector). Otherwise it will require a command that will be triggered
when clicking on a toolbar button (see the available Commands list).
The items are sorted by their rank.
Note
If you want to more advanced customization please refer to the Toolbar item definition.
Menu Bar#
The top menu bar definition can be customized through the Advanced Settings Editor. You can access it by opening the Settings Editor from the Settings menu, then click on the JSON Settings Editor in the top right corner.
In the Advanced Settings Editor, you will need to select the Main Menu section in
the left panel. Your menus customization will be merged with the default menu bar definition (this
is a different behavior as the other settings that are overriding the default settings).
So to remove a default entry, you will need to disable it. To do that, you will need
to set the menu entry disabled attribute to true; an entry is uniquely identified
by its command and args attributes.
New entries can be added to existing menus or you can create new menus.
"menus": [
  {
    // Disable the Run menu
    "id": "jp-mainmenu-run",
    "disabled": true
  },
  {
    // Move the Tabs menu to the end by changing its rank
    "id": "jp-mainmenu-tabs",
    "rank": 1100,
    "items": [
        // Add a new entry in the Tabs menu
        {
            "command": "launcher:create",
            "rank": 0
        }
    ]
  },
  {
    // Disable the Open from Path entry in the File menu
    "id": "jp-mainmenu-file",
    "items": [
      {
        "command": "filebrowser:open-path",
        "disabled": true
      }
    ]
  }
]
The above example, will results in the following changes:
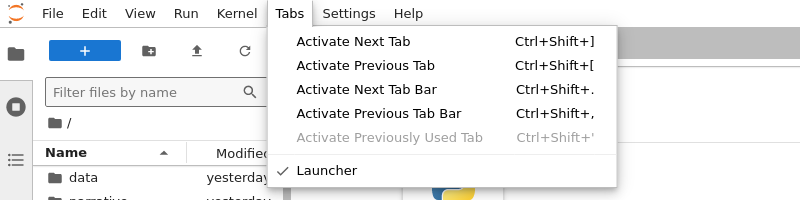
Default menu bar#
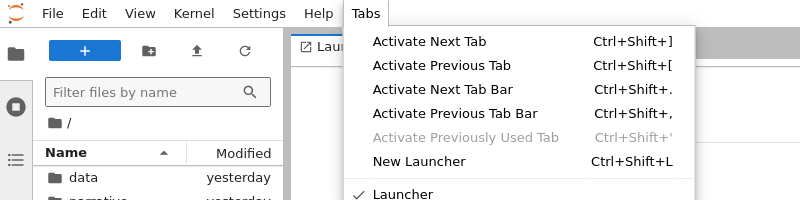
Customized menu bar#
The menu are identified by the following ids:
File menu:
jp-mainmenu-fileNew file submenu:
jp-mainmenu-file-new
Edit menu:
jp-mainmenu-editView menu:
jp-mainmenu-viewAppearance submenu:
jp-mainmenu-view-appearance
Run menu:
jp-mainmenu-runKernel menu:
jp-mainmenu-kernelTabs menu:
jp-mainmenu-tabsSettings menu:
jp-mainmenu-settingsHelp menu:
jp-mainmenu-help
An entry can be any valid command available; see Commands list. And the entries are sorted by their ranks.
Note
If you want to more advanced customization (e.g. changing the separators or sub-menus), please refer to the Main Menu settings definition.
Context Menu#
The context menu definition can be customized through the Advanced Settings Editor. You can access it by opening the Settings Editor from the Settings menu, then click on the JSON Settings Editor in the top right corner.
In the Advanced Settings Editor, you will need to the select the Application Context Menu section in
the left panel. Your contextMenu customization will be merged with the default context menu definition (this
is a different behavior as the other settings that are overriding the default settings).
So to remove a default entry, you will need to disable it. To do that, you will need
to set the menu entry disabled attribute to true; an entry is uniquely identified
by its command, selector and args attributes.
New entries can be added to existing menus.
"contextMenu": [
  // Disable New notebook entry
  {
    "command": "notebook:create-new",
    "selector": ".jp-DirListing-content",
    "args": {
      "isContextMenu": true
    },
    "disabled": true
  },
  // Add new entry on notebook file to export them as Markdown
  {
    "command": "notebook:export-to-format",
    "selector": ".jp-DirListing-item[data-file-type=\"notebook\"]",
    "rank": 3,
    // Command arguments
    "args": {
      "format": "markdown",
      "label": "Export as Markdown"
    }
  }
]
The above example, will results in the following changes:
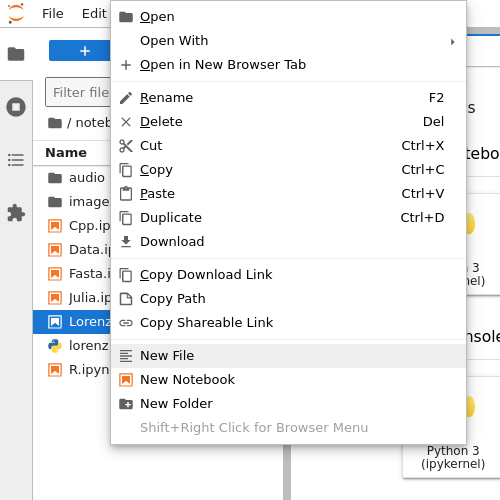
Default context menu#
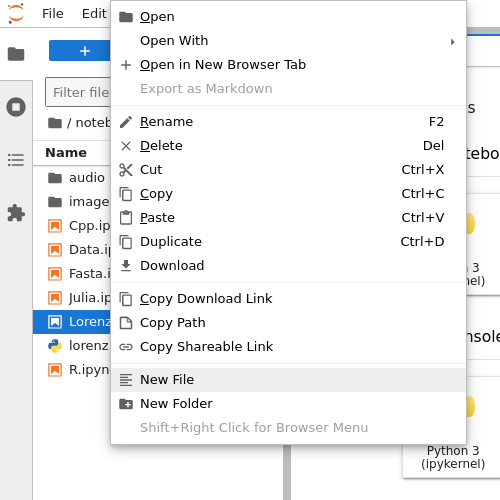
Customized context menu#
An entry can be any valid command available; see Commands list. And a CSS selector to define which elements will have that context menu entry. And the entries are sorted by their ranks.
Note
If you want to more advanced customization (e.g. changing the separators or sub-menus), please refer to the Context Menu settings definition.
File Browser#
Users can add a “Open in Simple Mode” context menu option by adding the following to Settings -> Application Context Menu -> contextMenu
{
  "command": "filebrowser:open-browser-tab",
  "args": { "mode": "single-document" },
  "selector": ".jp-DirListing-item[data-isdir=\"false\"]",
  "rank": 1.6
}
Applying Custom CSS#
To apply custom CSS, you can add a /custom/custom.css file in the
jupyter config directory. You can find the path, ~/.jupyter, to
this directory by running jupyter --paths. There you can create a
folder named custom and create a custom.css file within the
folder.
Custom CSS is not loaded by default. In the jupyter configuration directory, the
~/.jupyter/custom/custom.css file will not be loaded unless the the application is
initialized with the --custom-css flag (LabApp.custom_css config).
Jupyter Styling#
You can use a custom CSS file to modify default Jupyter styling.
/* Modify Jupyter Styles */

.lm-BoxPanel-child,
.jp-FileBrowser-Panel,
.lm-StackedPanel-child,
.jp-FileBrowser-toolbar {
  background-color: #aecad4 !important;
}

#top-panel-wrapper,
#jp-top-bar {
  background-color: #aecad4 !important;
}

#menu-panel-wrapper,
#jp-MainMenu,
#menu-panel {
  background-color: #aecad4 !important;
}

.jp-NotebookPanel-toolbar {
  background-color: #aecad4 !important;
}

.lm-MenuBar-content {
  color: #02484d;
}

.lm-TabBar-content,
.jp-DirListing-content,
.lm-MenuBar-content {
  font-size: small;
}
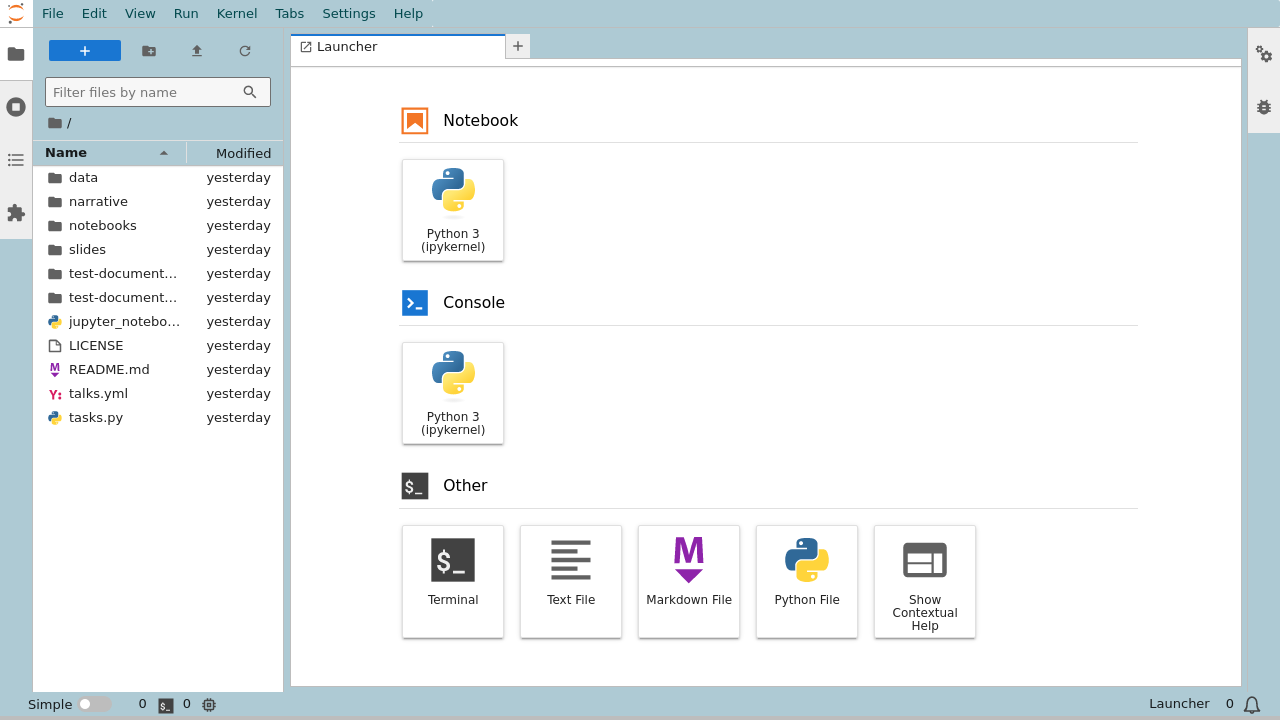
Markdown Styling#
Another potential application for custom CSS is styling markdown.
/* Styling Markdown */

/* Headings */
h1,
h2 {
  font-family: 'DejaVu Mono', sans-serif;
  font-weight: bold;
  text-shadow: 2px 2px 4px #000;
}

h1 {
  font-size: 22px;
  margin-bottom: 40px;
  color: #10929e;
  text-decoration: underline;
}

h2 {
  font-size: 48px;
  margin-bottom: 32px;
  color: #76b4be;
  text-transform: uppercase;
}

/* Block Quotes */
blockquote {
  font-family: 'DejaVu Mono', serif;
  font-size: 16px;
  color: #19085c;
  border-left: 8px solid #effffc;
  background-color: #eafcff;
  padding: 20px;
}

/* Lists */
ul,
ol {
  font-family: 'DejaVu Mono', sans-serif;
  font-size: 18px;
  color: #333;
  margin-bottom: 24px;
}
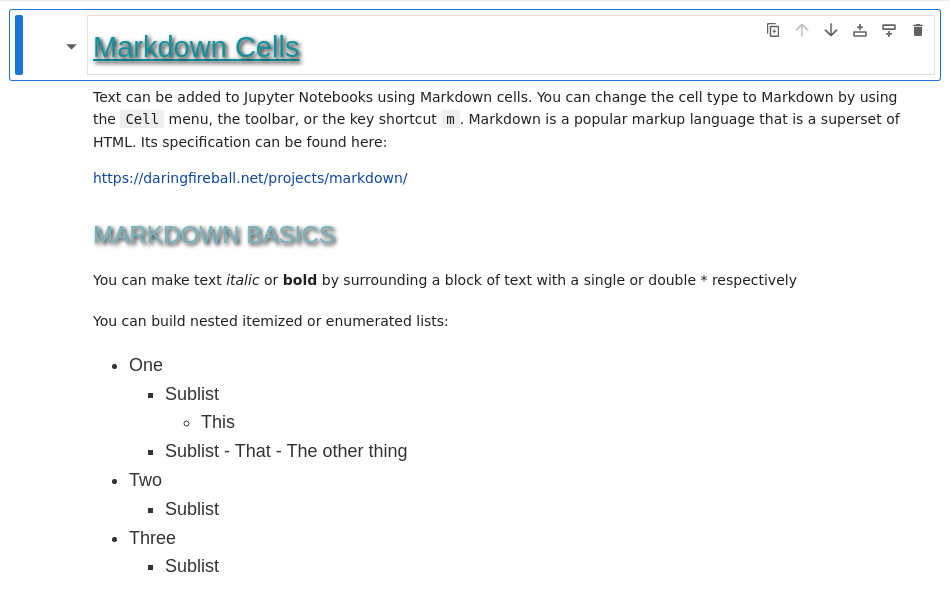
Settings Editor Plugin Filtering#
The Settings Editor supports configurable filtering of plugins to hide specific plugins from the settings interface. This allows administrators and power users to hide complex or sensitive plugins while keeping them fully functional. The hidden plugins will remain accessible in the JSON Settings Editor.
Configuration Options#
Via Settings UI#
Open JupyterLab Settings Editor (Settings > Settings Editor)
Search for “Settings Editor Form UI”
Find the “Additional plugins to skip in settings editor” field
Add plugin IDs in the format
package:pluginSave the settings
Via overrides.json#
Add the following to your overrides.json file:
{
  "@jupyterlab/settingeditor-extension:form-ui": {
    "toSkip": ["my-extension:plugin-to-hide", "another-extension:config-plugin"]
  }
}
Plugin ID Format#
Plugin IDs usually follow the format: package-name:plugin-name
For a complete list of core plugin IDs, see the Core Plugins documentation.
Alternatives#
If you need to completely disable plugin functionality, consider:
Disabling extensions entirely via the Extension Manager
Using
page_config.jsonto disable specific pluginsUsing the command line:
jupyter labextension disable package-name:plugin-name